 Here's a quick scrapbook page I put together for an introductory class last night. There was no stamping involved, but we did play with some inks & a couple of different direct-to-paper techniques. Even if a scrapbooker never intends to stamp in their scrapbooks or anywhere else, I always recommend to them that they have at least one brown ink in their supply closet. Ink is so versatile. With ink and a simple sponge dauber, you can soften the appearance of the edges of your paper, quickly making something look aged or distressed. Or....if you take the inkpad directly to the edges of your paper or photo, you can actually give them more definition. This trick comes in especially handy if you are dealing with multiple patterned papers. Multiple patterns that are layered can sometimes become overwhelming and appear to blend together, if the edges are not clearly defined. This can also help to 'pop' a photo or photo mat off the page if layered directly on a busy pattern - calling attention to the photo, which if of course the goal of creating the page in the first place. Inking is essentially an inexpensive way to give your pages some 'dimension', and doesn't add any bulk.
 This page was especially fun for me as I started with a pre-printed layout page, something that I often forget about. At left is the before picture. I cut a couple of squares from coordinating cardstock and made some photo mats (2 different sizes). Scissor distressed the edges of the pink ones, and inked the edges of the Vanilla ones -- although I admit it is difficult to see that in this picture. I cut the title on my Wishblade from Bamboo cardstock and inked it with a sponge dauber --- then added a simple paper flower and my photos. Voila! A completed layout - in less than 10 minutes! The strips on the side are for my journalling, and I will add simple names and dates (when I find my brown pen).
2/01/2008
A Little Bit of Ink

9/18/2006
Colouring with Watercolour Pencils
This is such an easy, yet effective technique to create soft, subtle shading. Tools Required:
- Stamped Image
- Watercolour Pencils
- Blending Pen
How-To:
1. Stamp your image onto cardstock.
2. Using your watercolour pencils, add a touch of colour to the desired areas of your stamped image. Keep in mind that this colour will be blended in the next step to fill in more of the shape, so you should add your colour in areas that you wish to have 'darker' or more saturated colour when all is complete. It is helpful to visualize a light source and place your colour in areas that would naturally appear darker if you wish to achieve a realistic look. In this photo, I have added the colour towards the centre of the flowers.
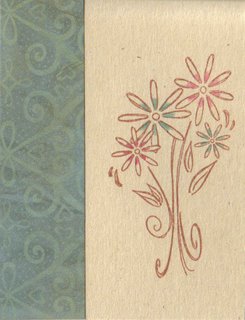
3. Using your blender pen.....pull the colour you added in step 2 outward to fill the rest of the shape. Don't use a back and forth motion - simply 'pull' the colour in one direction towards the area that you want coloured, but to appear lighter. See sample below.
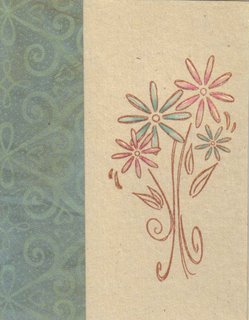
4. Simply continue adding colour to your image as desired, then finish your card.
Tips:
- The same basic process can be done using a Waterbrush or Aquapainter type tool. The end result is even more like a watercolour painting. If you opt to use a waterbrush, I suggest stamping your image in a waterproof ink like Stazon to ensure the outline colour doesn't blend as well.
- If you emboss your main image first, the fill in with watercolour pencils and a waterbrush - the result will look much like a stained glass window.
- When colouring small areas, be sure to use the fine point of your blender pen (it is dual-tipped), you will have much better control.
If you have a watercolour art piece that you'd like to share - email me a pic or a scan and I'll post it here on my blog!
Have Fun!


