Showing posts with label Anything But a Card. Show all posts

1/18/2010

Your Rock! My Creations Memory Keeper


So I'm still playing with the You Rock papers and the stamps and embellishments included in the You Rock Workshop on the Go and it is too fun!

This weekend, I finished up my very first My Creations Memory Keeper - and suffice it to say there will definitely be more of these projects in my future!  The My Creations Memory Keeper boxes measure 10" x 9 1/2" x 3" and are made of a sturdy chipboard material.  You can paint them, stamp of them or like I did, cover them with paper.  They are folded flat for shipping and storage and are only $8.25 (Cdn.).  These are pretty impressive actually - in fact even my husband thought they were pretty cool!

Here's a look at the top of the box.  The photo was a professional shot taken in the fall of my son in his hockey gear.  I absolutely loved the photo and knew I just needed to find a fabulous way to display it.

Photo credit: Michael Zajczenko (www.mzphotos.com)

I used a whole bunch of embellishments on this one - buttons, chipboard, the new 'Rockin' Top Coats, ribbon, stamps and ink.  I just love the fact that I could add a ton of dimension to the layout on the top of the box since I didn't have to worry about it getting squashed in an album, or in a frame.  I painted the chipboard swirl and letter with CTMH Creat-a-Shade Pearl paint which unfortunately doesn't photograph well but is tinted with a combination of Crystal Blue and Outdoor Denim reinkers.  I brushed the paint on the 'J' and got a reasonable smooth result, but decided to stipple on the swirl to give it some texture!  Here is a better look at the embellishment bundle.  The circle chips are sponged with Plum Mist ink (I swear they're not pink!  LOL!)


As I said, I will definitely be doing more of these Memory Keeper boxes and in fact my daughter has decided that this is the craft we'll be doing at her birthday party in a couple of weeks - so that should be loads fun to see what the kids can come up with!

11/20/2009

Kaiser Craft Advent Calendar Part 4

This is a multi-part article.  Follow these links for Part 1, Part 2 and Part 3.

So now that I'm fully assembled - I can start decorating.

The calendar kit includes 25 boxes and they are packed flat.  This means they need to be assembled.  They are pre-scored so assembly is a cinch - you just need to decide what type of adhesive to use.

I actually took a no-glue route, but I talked to a couple of friends and they both recommended using something super sticky like Dazzling Diamonds (SU) or Liquid Glass (CTMH).  Taping the boxes doesn't seem to work.

My no-glue choice:  I've said it before, I'm a lazy crafter - so instead of gluing my boxes together, I opted to wrap patterned paper all the way around them and rely on the paper to keep them in shape.  Of course this only works if you plan on wrapping the paper like I did, and you will need glue of some kind for sure if you're planning only to decorate the front.

Here's how I did it.

Cut strips of patterned paper to 4cm x 18cm.
Adhere one end of the strip to the back of the box.
Using a bone folder, score the strip (using the box side as a guide to score line positioning) and adhere to the next side.
Repeat scoring and adhering until the strip is wrapped all the way around.
Use a strong bond adhesive like red line tape or glue dots to stick the remaining end to the back of the box.

The trick to making this work is to be sure to adhere the paper to all sides as you go around.

I used the following two patterns to cover my boxes plus a little bit of another glittered paper by Best Creation Inc (not shown)


  • Rejoice Words Paper (Flair Designs)
  • Snowy Serenade Overture (Bo Bunny)
  • Unknown Glittered paper by Best Creation Inc. (not shown)
These pics aren't the best - and it especially doesn't do justice to the Bo Bunny design (which is absolutely gorgeous) that has a nice glittered shine to some of the areas.  Actually - in these pics they don't even seem to match all that well.....but you'll have to trust me - this will work.

Once I had the box covered, I used my Coluzzle knife (and mat) to cut out the half-circle at the front of the box.  The half circle acts as a finger pull.  Unfortunately I didn't take any pics of the covering process since I did it while watching TV.  Sorry.

Nonetheless, it's that easy.

Next, I decorated the chipboard numbers.  I considered a couple of different things here - ink, paint, markers etc. but settled on using Glimmer Mist by Tattered Angels.  The Glimmer Mist was super simple to apply - just spray and let dry.  (Just remember to spray inside a shoe-box to avoid damage from overspray! There tends to be a lot of it!)  The Glimmer Mist dries quick and looks awesome.  This was a great choice.

Next, I glued the numbers on....and voila!  I used a liquid glue by UHU to adhere them.  I'm not generally a fan of liquid glues, but this sticks really well, dries pretty quickly, and I like the applicator.

Here is a sneak peak at my progress so far.  My next and final post will be the complete reveal, with the centre section all decorated.


To be continued..

11/19/2009

KaiserCraft Advent Calendar Part 3

This is a multi-part article, follow these links for Part 1 and Part 2.

So if you've been following my progress, you'll know that I've got my KaiserCraft advent calendar, unpackaged, sanded and painted.

Next Step:  Assembly

This stage of the project took me just under an hour I would guess.  To complete the task, you'll need a hammer, some wood glue (remember this part) and a block of wood to hammer on.  You will recall from my photos that the calendar goes together with a series of tongue/groove joints.  The base (or back) of the calendar has a bunch of slots in it, and each of the pieces (sides and shelves) has tabs.

I recommend figuring out exactly where each piece is going to go (it's not hard) before you start putting it together, since they do fit pretty tightly.  If you make a mistake, it is possible to get them apart, although it is a bit tricky.  More advice:  Don't hammer directly on your MDF, since it's tough but not all that tough if you get my drift.  The last thing you want is to get this far and crack a piece.  You may also wish to use wood glue to give you some additional security.  I didn't initially, but found out after the fact that it would probably have been a good idea (keep reading to find out why).

I started first by securing each of the longer pieces that formed the outside and inside frames, and then moved on to securing the small dividers.  It is at this stage that good, thorough sanding really pays off.  Remember that 'nub' that I talked about yesterday?  Well, if you don't get it off completely (or at least almost), these little dividers won't fit or will cause the outer and inner frames to bow.  Not nice.  So check your 'nubs' and make sure they are all gone.

Once I had my calendar fully assembled (or almost), it looked like this.


I had one piece left over - a long skinny one.  I didn't know at first what it was for, but I went to KaiserCraft and found out.  It's for the very bottom of the unit - so that when fully assembled it stands flat on a table.  If haven't put it on yet - so it's not in the picture, but trust me, it could very well be necessary.

Once I got this far, I realized that wood glue probably would have been a big help.  See my corner - it's not quite lined up.


So depending on how picky you are - this may or may not suit you.  For me, I didn't like it - so I decided to try and fix it up a bit.  Now, since I didn't want to disassemble the whole thing (I'm lazy), I thought I would try sneaking some glue in and around that joint to try to tighten it up.  I used painters tape and a clamp to help me hold it tight while the glue dried.  It worked fairly well, and I'm comfortable with the end result, but I would definitely recommend using the glue as you go method - it would be much easier.

This is when I also realized that the long skinny piece would actually be quite handy.  Once the frame was all 'squared up', it no longer sat quite as straight.  I know it sounds odd initially, but this is because the the back of the unit is slightly larger than the outer frame, by design.  When the frame was left to it's own devices, it compensated for the slight difference I guess and bowed down in the front (which evened out the stance).  After I had squared up the frame though - it no longer bowed, and thus the stance became uneven - know what I mean?).  So, you may need this piece, or you may not - that just depends on how picky you're going to be about getting everything completely square.

So now that I have my calendar frame fully assembled, the fun part begins --> assembling and decorating the drawers.

Stay tuned for the next installment in my adventure to see how I did this.

11/18/2009

KaiserCraft Advent Calendar Part 2

To read Part 1 of this article click here.

So as I mentioned earlier - this little gem of a project came with NO instructions for assembly.  This was a bit intimidating at first, but I quickly realized that it wasn't that difficult.

Basically - if it looks like it should be snapped apart - do it, and if the piece looks solid, leave it that way.

Now, on to the next step --- Sanding.

Due to the way this was packaged, once you snap all of your pieces apart you'll be left with a bunch of extra 'nubs' that need to be removed.  If you don't remove them, not only will you calendar not sit properly against a wall (if you decide to hang it), but also, it just won't fit together snuggly.  To remove them, you should first snip them off with a craft knife, and then sand, or file down what's left.  Trust me when I say if you skip the snipping part, you will be sanding for a really really long time (there are way too many nubs to remove)!

The picture below will hopefully help you understand what I mean.


I actually took that photo before I had snapped those pieces apart, but I think it's still clear.

To sand down the nubs, I used a hand-held metal file that I found in my husband's tool box.  I don't actually know what it's intended use is, but it worked great on this project!  I initially tried regular sandpaper, but found it was really tedious.  The metal file worked much better.

Up to this stage I had probably spent just over an hour unpackaging, snapping and filing.  Now it was time to paint - so I laid all of my pieces out like so.


It was right about now that my husband came home and saw me doing this on our dining room table.  Let's just say he was unimpressed -- but c'est la vie.  It was the only surface around that was large enough to spread out all of the pieces.  {I was careful, I promise.}

Since I knew I wanted to paint it brown -- I initially reached into the craft cupboard for some brown acrylic paint.  Bad choice.  I am NOT a good brush painter, and I quickly realized that there were WAY too many pieces for me to fiddle around with.  So instead, I went to the basement, and got out the extra wall paint that we had used last year in our hallway (brown of course), grabbed a small roller and tray and started painting.

Because the MDF tends to absorb the paint, a good 2 coats was required to get even coverage, and of course because I wanted to paint both sides of each piece, this took a while due to the drying time.  One caution here.  You can see that I covered my work surface with newspaper.  In retrospect, this wasn't all that smart.  Plastic of some kind would work better.  Since I'm a bit of a messy painter, some of my pieces (actually a lot of them) ended up sticking to the newspaper after I had painted side one.  Once they were dry, and I went to flip them, I found this out.  As a result, some bit of newspaper did get stuck to the undersides - newspaper which I tediously peeled and picked off so that I could continue painting.

Finally though.....here was the fruits of my labour -- a whole whack of MDF board that was now Brown instead of the unfinished tan that it was when it arrived here.  I think I would have had a bit bigger sense of accomplishment had I painted them Red.  While I knew that it would be worth it in the end, at this stage, it seemed like an awful lot of effort had gone into this for what really was a marginal change in appearance.  But again....c'est la vie.

Here's a pic of the painted pieces.  I took this photo when the second coat was still wet, so you'll have to trust me for now that it did dry a bit darker than this.


To be continued.....

A Cool New Project: KaiserCraft Advent Calendar {Part 1}

On the weekend, I snagged what I think is a very cool project kit that is just perfect for the holidays: The Advent Calendar from KaiserCraft.  It is part of their 'Beyond the Page' line - which I had never seen before.

If you're not familiar with it, this kit was released at CHA this year and contains pre-cut MDF board that when assembled looks like the picture on the right.  That photo is taken from the KaiserCraft website.  Now, I admit, that photo isn't all that exciting if taken at face value, but all of you crafty people out there will surely agree that this little gem has a ton of potential to become a really rockin' altered art piece.

Because this was more involved than most of the projects I take on (like cards or scrapbook pages), I thought I would take some pics along the way and chronicle the process right here on my blog.  So starting from the beginning.....

Here's a pic of the materials as packaged:


As you can see, the packaging is extremely basic - with all of the pieces stacked and shrink wrapped.  There are definitely no frills here, but you do get a picture of a completed sample calendar - which is cute for sure.  You can also see that they have included a sheet of chipboard numbers (zero thru 9).  I haven't checked them out yet, but I would image that you have just enough to complete the calendar as shown - it doesn't look like there are many extras, if any.

Next after unwrapping the package, and laying out all the pieces, here is what you'll see. (I took this with no flash and the lighting was poor, so please excuse the 'yellow' hue.)


Very very quickly I noticed there was one very important thing missing.......INSTRUCTIONS!  Can you believe it?  You've got a pile of MDF shapes, and no idea how to put it together.  Aye yi yi.

Are you excited to see how this all comes together?  I am.

Stay tuned for more updates as I progress through the assembly.

8/28/2009

All Wrapped & Ready

Those of you that follow me on Twitter know that I received a package in the mail yesterday that I've been waiting for for a bit now. I can't say out loud here exactly what was in the box since it is a gift for someone that might read this before I hand it over, but suffice it to say when she does get it, she's gonna love it!

And...since I am try to take advantage of every possible opportunity to get crafty, I set to work designing some custom packaging. How fun is that?
I surfed the net for a while, and found lots of way cute packaging ideas but unfortunately, none of the items I came across were suitable to hold the item in question (but I did bookmark them for future reference of course!). So instead, I had to go totally custom on this one. I kept it simple - and built a 2 piece box that fit the 4 1/2" x 5 1/2" item perfectly.
The papers and embellies I used on this one are all CTMH - and the ribbon is my absolute favourite element (I've been hoarding it for a while now). It says "share live laugh love give create". I thought it very suitable for the occassion. The plaid paper is from the "Aspen" collection - also one of my faves.
Here's a couple of more pics for you.

The item wrapped up inside (Sorry the tissue is crinkly - it was all I had).

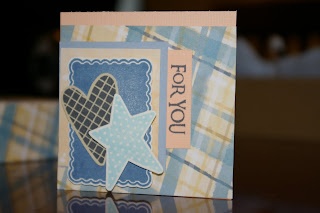
Close up of the matching notecard that I slipped in the box. (I sure wish I could figure out how to properly photograph items so they show their true dimension. This card has foam square popping out the scallopped panel, and more under the star.) The heart, scalloped pane and star are from CTMH Thoughtful Seasons.

I just can't wait to hand the package over - I'll have to try to make that plan for sometime this weekend!
Until next time.

10/15/2008

Every Once in a While

you find the absolutely cutest pattern online, and have to make one 'just because' -- and that my friends is how I came to make this.

As luck would have it though....my friend's daughter is turning 'Sweet Sixteen' on Sunday and we're going to dinner. So, I will fill the gift card wallet with a card from her favourite store, fill the rest of the space in the 'shoe' with some candies and call it a day. I think she'll love it! (or at least I hope so, as I don't really want to part with it.)

If you're interested in trying this one for yourself, check out this post at Artistic Paperie where you can pick up a template. April (the site owner) has just recently started blogging again after a brief hiatus, and I for one think that's fab! She is full of great ideas, and posts some absolutely amazing art. Believe it or not, last Fall she made a pile of these shoes, and filled them with Halloween treats. I gotta say, she has a lot more patience than I do as I admit that this one was a bit tricky and picky to put together. As you can see, I did manage to get it together in the end and I think I will make at least one more of these cute containers in the near future to give as a gift - and at least one other for my daughter's room. Quite simply, she just fell in love with it as soon as she saw it - and asked me to make her one. I suppose if that's all it takes to keep my six-year-old happy, a paper shoe, I'm pretty lucky.